Category Archives: Extending EPiServer

Getting a previewable property value with UIHint.PreviewableText

You might have seen that the field “Name in URL” first gives you the value and the editor needs to click “change” to edit it.
nameinurl

You can also accomplish this on your normal string properties by using the UI Hint “previewabletext” (also found as the constant UIHint.PreviewableText).

[Display(Name = "My Property")]
[UIHint(UIHint.PreviewableText)]
public virtual string MyProperty { get; set; }

And it will look like this:
previewable

Tweaking and extending serialization from Episerver Content Delivery API

As you’ve probably heard, Episerver is creating a Headless CMS API called “Content Delivery API“.

With this, you can get, list and search (requires Episerver Find) content from Episerver in a JSON format.

Matthew Mols has some blog posts about how to get started: Getting started with the Episerver Content Delivery API and Add HTTP Caching to the Episerver Content Delivery API.

I just started looking at it myself and found some basic ways how to tweak the output of the API when it comes to Content and Properties.

Basics

A simplified description of what you get from the API is a JSON serialized ContentApiModel. ContentApiModel is basically a copy of the Content populated depending on what content interfaces your content implements.

The model returned is

  • If the content implements ILocale, set the Language property
  • If the content implements ILocalizable, set the MasterLanguage and ExistingLanguage properties
  • If the content implements IVersionable, set the properties StartPublish, StopPublish as well as Status
  • If the content implements ICategorizable, add a CategoryPropertyModel to the ContentApiModel.Properties property

Also, for each PropertyData in your Content.Property try to find a registered IPropertyModelHandler that has an TypeModel that can handle the Property Type.

TypeModel you say?

The TypeModel contains three things:

Type Name Description
Type PropertyType Which Property Type this TypeModel can support. For example PropertyContentReference, PropertyXhtmlString etc.
Type ModelType The type of the class that takes care of the rendering. Needs to implement the Interface IPropertyModel.
string ModelTypeString The name of the PropertyModel, normally the same name as the name of the ModelType.

PropertyModel

This is a ContentDelivery version of the PropertyData. This is what is rendered as a JSON for each Property on your Content.

For example the PropertyNumber would be represented by NumberPropertyModel. The NumberPropertyModel has a Value (the numeric value of your property) and a PropertyDataType which usually is the name of the value type (in this case “PropertyNumber”).

How do I add Custom Properties or replace the JSON output?

Adding for new Properties

For example if I’d be using ImageVault including their custom Property Types, the property won’t be displayed as no IPropertyModelHandler that can handle PropertyMedia.

Instead of creating your own implementation of IPropertyModelHandler, you can just add more TypeModels to the existing one in an InitializationModule.

So let’s add a ModelType for PropertyMedia in the InitializationModule. Mimicking how Episerver handles their common Property types, the JSON output will look like this:

"Image": {
    "Value": {
        "Id": 33114,
        "Effects": [],
        "IsReadOnly": true,
        "IsModified": false
    },
    "PropertyDataType": "PropertyMedia"
}

Which isn’t really helpful since ImageVault images are not served as content so we can’t use that ID with the ContentDeliveryApi. We need to add a little extra information so let’s create a new PropertyModel that will wrap the MediaReference, but also add a Url to the image.

Replacing for existing Properties

This is the same procedure but instead of creating a new TypeModel, just replace the value of the ModelType property with an own Type in the InitializationModule.

Check an example of InitializationModule to add or replace properties.

The toolbox for PropertyModels

There are some nice base classes that you can play with. The key Interface you need to work with is the IPropertyModel:

IPropertyModel

This is the most basic Interface that you need to implement according to the default PropertyModelHandler. It only contains two properties:

Type Name Description
string Name The name of the Property Model, usually the name of the Episerver Property type.
string PropertyDataType The name of the Property Model, usually the name of the Episerver Property type.

What I can see when reflecting Episerver’s code, it seems like your implementation also need a constructor with a parameter with the PropertyData.

public class MyPropertyModel : IPropertyModel
{
    public MyPropertyModel(MyPropertyData property)
    {
        // Do something to the property, and add the output to Properties for serialization
    }

    public string Name { get; set; }
    public string PropertyDataType { get; set; }
}

For your convenience, Episerver have a base class for this: EPiServer.ContentApi.Core.PropertyModel where TValue is the value you should output in your JSON, and TType is the PropertyData. Check some examples where I’m serializing the Property value or even serializing with extra information.

As the PropertyModel is serialized to a JSON, all properties on your implementation will be included in the result (except if you decorate the property with the JsonIgnore attribute – see below).

IPersonalizableProperty

If the output of your Custom Property depends on personalization, implement the IPersonizableProperty. The interface only requires a Property called ExcludePersonalizedContent, but it seems like your implementation need a constructor with the PropertyData AND a boolean.

public class MyPersonalizedPropertyModel : IPropertyModel, IPersonizableProperty
{
    public MyPersonalizedPropertyModel(MyPropertyData property, bool excludePersonalizedContent)
    {
        if (excludePersonalizedContent)
        {
            // add logic to exclude personalized content
        }
    }

    public string Name { get; set; }
    public string PropertyDataType { get; set; }
    public bool ExcludePersonalizedContent { get; set; }
}

For your convenience, Episerver also have a base class for this: EPiServer.ContentApi.Core.PersonalizablePropertyModel where TValue is the value you should output in your JSON, and TType is the PropertyData.

IExpandableProperty

IExpandabeProperty is used for properties that where you can return a simplified set of data for the initial API Request, so that the Client can make further requests to dig deeper into the data.

ContentAreas and ContentReferences are two examples for this. The first response for a ContentArea would look like this:

"MyContentArea": {
    "Value": [
        {
            "ContentLink": {
                "Id": 9,
                "WorkId": 0,
                "GuidValue": "5f3d81e6-28f8-4f16-b998-87378fc9c4d6",
                "ProviderName": null
            },
            "DisplayOption": "",
            "Tag": null
        }
    ],
    "PropertyDataType": "PropertyContentArea"
}

But if it would be expanded by having the parameter ?expand=Steps or ?expand=*, the JSON output for the ContentArea would look like this:

"MyContentArea": {
    "ExpandedValue": [ // When expanding, expanded information goes here
        {
            "ContentLink": {
                "Id": 9,
                "WorkId": 0,
                "GuidValue": "5f3d81e6-28f8-4f16-b998-87378fc9c4d6",
                "ProviderName": null
            },
            "Name": "My Block",
            "Language": {
                "DisplayName": "English",
                "Name": "en"
            },
            "ExistingLanguages": [
                {
                    "DisplayName": "English",
                    "Name": "en"
                }
            ],
            "MasterLanguage": {
                "DisplayName": "English",
                "Name": "en"
            },
            "ContentType": [
                "Block",
                "MyBlock"
            ],
            "ParentLink": {
                "Id": 8,
                "WorkId": 0,
                "GuidValue": "87a9ae8a-a2a8-40e5-8c09-5c5c55a73e17",
                "ProviderName": null
            },
            "RouteSegment": null,
            "Url": null,
            "Changed": "2018-04-09T16:05:01Z",
            "Created": "2018-04-09T16:05:01Z",
            "StartPublish": "2018-04-09T16:05:01Z",
            "StopPublish": null,
            "Saved": "2018-04-09T16:05:34Z",
            "Status": "Published",
            "Category": {
                "Value": [],
                "PropertyDataType": "PropertyCategory"
            },
            // Other properties goes here
        }
    ],
    "Value": [ // Here goes the original value before expanding
        {
            "ContentLink": {
                "Id": 9,
                "WorkId": 0,
                "GuidValue": "5f3d81e6-28f8-4f16-b998-87378fc9c4d6",
                "ProviderName": null
            },
            "DisplayOption": "",
            "Tag": null
        }
    ],
    "PropertyDataType": "PropertyContentArea"
}

Note that expanding will only dig through the first level of nested Content.

[JsonIgnore]

If you have Properties on your ModelType that you don’t want to be included in the JSON output, just decorate it with the JsonIgnore Attribute.

Summary

I hope you learned something new about Episerver’s Content Delivery API. It’s still kind of new and the documentation is not very good yet.

If you have any tips and tricks, feel free to blog about it and give me a shout! Always nice learning something new!

Presenting: Find My Content

My main project is a multi website solution where 16 different websites is sharing the same source code.

Sometimes when we need to change specific Content Type and find a strategy on how to migrate the changes it’s good to know how much that Content Type is used, and in what way.

How do you do that?

A way to to find how much it is used is to perform a simple SQL Query:

SELECT c.pkID FROM tblContent c
INNER JOIN tblContentType ct ON c.fkContentTypeID = ct.pkID
WHERE ... = '...' -- various ways to identify your Content Type using pkID, ContentTypeGUID or Name

And go to Episerver Edit Mode to see how the editor has worked with each content.

But to be able to run the SQL query, you will need to have access to the production database which makes things a little more annoying. Specially if you need to use VPN connections or similar.

Therefore I have created an Admin Tool called “Find My Content” where you easily can find all content based on their Content Types.

Listing all Content Types

findmycontent.PNG

Here you see how many items of this Content Type is created by clicking the Name.

Details of a Content Type

findmycontent standardpage.PNG

In the details you can see all Content of this Content Type and which language they are created in. There is also a shortcut that will take you to Edit mode for that specific Content.

How do I get it?

I’m waiting for a NuGet package to be published on Episerver’s NuGet feed. Otherwise you can find the code on my GitHub.

Update: It is now available in the feed: https://nuget.episerver.com/en/OtherPages/Package/?packageId=Toders.FindMyContent

What’s next?

This was just something I threw together since I got tired connecting to my client’s environments using VPN and Remote Desktop.

I’ve got some ideas to add references between the different content, filtering on values for specific properties and so on.

Do you have any other ideas that would be nice to have in this tool? Just give me a shout in the comments below.

Episerver Event Helper v3.0

Years pass and hopefully you learn something and become better!

One thing that have been poking on my conscience for a while is the old EPiEventHelper that I blogged about a couple of years ago.

What’s wrong with it?

There are two things I don’t like with it.

1) Unclear usage

I have seen that it has been some confusion with how to best access the content – using the eventArgs.Content or using this.

public class StandardPage : PageData, IPublishingContent
{
    public void PublishingContent(object sender, ContentEventArgs e)
    {
        // this is how to access the already cast instance of the content.
        StandardPage standardPage = this;

        //This is the content from the argument, needs to be casted to your Content Type. But to me it feels more correct.
        IContent contentFromArgument = e.Content;
    }

}

A common question is if the e.Content and this are two different instances (they are the same) and which one should be used (honestly I don’t have a recommendation).

2) Single Responsibility Principle

The second thing is that this implementation violates the Single Responsibility Principle. The class representing your Content Type should been seen as a View Model or Data Model and therefore it should not contain any behavior or business logic.

I have seen some examples where the logic found in the event is really large, making the Content Type class very messy and hard to understand.

Presenting – EPiEventHelper 3.0

What? Why 3.0?

Pavel Nezhencev already created a NuGet package with EPiEventHelper and later upgraded it to use Episerver 10, calling it version 2.0. If I want to publish my version with new features to NuGet.org I need to bump the version even further.

What’s new?

First of all I have stopped checking if the current Content implements the event interface. Instead I’m using to use the IoC container in Episerver where you as a developer can add your own things.

This means that you will need to decorate your implementations of the interfaces with the ServiceConfiguration attribute.

[ServiceConfiguration(typeof(IPublishingContent))]
public class PublishingContentEvent : IPublishingContent
{
    public void PublishingContent(object sender, ContentEventArgs e)
    {
        IContent content = e.Content;
        var standardPage = content as StandardPage;
        if (standardPage == null)
            return;

        // Do something with your standard page
    }
}

Breaking change: This also means that if you are using the previous version of EPiEventHelper, you can no longer refer to the content using this!

public void PublishingContent(object
    sender, ContentEventArgs e)
{
    this.Name = "Hello World!";
}
public void PublishingContent(object
    sender, ContentEventArgs e)
{
        e.Content.Name = "Hello World!";
}

Breaking change: The interface does not know anything about the class representing your Content Type and therefore you will need to cast e.Content yourself!

public void PublishingContent(object
    sender, ContentEventArgs e)
{
    this.Title = "Hello World!";
}
public void PublishingContent(object sender,
    ContentEventArgs e)
{
        var content = e.Content as StandardPage;
        if (content == null)
            return;

        content.Title = "Hello World!";
}

Unless…

I have created a workaround for this where you can have the same pattern to bind the Episerver events, but only apply if to specific Content Types AND the Content will also be typed!

New functionality: Each interface have an abstract base class where you specify which Content Type class you want to use. As usual you use the ServiceConfiguration attribute to bind your implementation to the event.

[ServiceConfiguration(typeof(IPublishingContent))]
public class PublishingStandardPage : PublishingContentBase<StandardPage>
{
    protected override void PublishingContent(object sender, TypedContentEventArgs e)
    {
        // Here you can access the standard page
        StandardPage standardPage = e.Content;
    }
}

You can also specify if the Content that the event applies to needs to be the exact Content Type or that the class would inherit from it by overriding the boolean property AllowInheritance.

protected override bool AllowInheritance { get { return true; } }

Tests

I’m still learning how to best create tests with Episerver, so I have added a Test Project where I want to test if the events are bound and unbound properly.

I have also added some tests to make sure that I have not missed any interfaces or classes. The project is found in the same GitHub Repo.

You’re welcome!

I would really recommend that you take your time to extract the code for your events from the Content Types.
Just putting the ServiceConfiguration attribute on your Content Types would instantiate the class in a way that doesn’t always play well with Episerver.

I’m planning to update the NuGet feed with my new version! Keep your eyes open for updates in Visual Studio if you have used the previous version.

Customize “Suggested Page/Block types” when creating content

I’ve found a neat way to improve the editor experience – IContentTypeAdvisor and it can be found in the EPiServer.Cms.Shell.UI.Rest namespace of the assembly EPiServer.Cms.Shell.UI.dll.

This interface is used to populate the list of suggested Content Types when creating new content.

This interface has one method GetSuggestions which returns an collection of ids of block types and takes the following input parameters:

  • iContent Parent
    The parent item where the editor wants to create the new content.
  • bool contentFolder
    This is true if the editor is creating your new content within a Content Asset Folder.
  • IEnumerable<string> requestedTypes
    This is a list of the kind of content to create. The value comes from the UI and therefore they are just strings like “episerver.core.blockdata” or “episerver.core.pagedata”. If created through a component in the asset pane it can also have the value of the CreateableTypes.

The default implementation in Episerver is to suggest the same content types as already created.

defaultcontenttypeadvisor
An example of usage would be to help the editor create a slideshow where the slideshow including each slide in it are blocks.

So what I want to do is to suggest the Slide block if the editor already has created a Slideshow block in that same folder.

CUT TO THE CODE

First of all I’ve have some new Block Types, one for the Slideshow that has a ContentArea where you put each slide represented by a SlideBlock.

And I will need to create an implementation of the IContentTypeAdvisor.
[ServiceConfiguration(typeof(IContentTypeAdvisor))]
public class ContentTypeAdvisor : IContentTypeAdvisor
{
    public IEnumerable<int> GetSuggestions(IContent parent, bool contentFolder, IEnumerable<string> requestedTypes)
    {
        ...
    }
}

Note that I’m registering this to Episerver’s IOC using the ServiceConfigurationAttribute. This is to tell Episerver that I want to use this implementation.

Episerver looks for all registered implementations of this interface instead of just 1, therefore I don’t need to do anything with the previous registrations (unless I want to, see further down).

What I want the advisor to do is check is whether the parent has any children that is a Slideshow block. If so the advisor will suggest the Slide Block.

bothadvisors
This is quite easy as can be seen in my SlideshowContentTypeAdvisor.

It is also a good practice to check whether the suggested content type (in this case the Slide Block) is available as child to the content parent and that the editor has the proper access rights to create a Slide Block).

But I want to use my Content Type advisor INSTEAD of the Default one?

It’s easy to remove the already registered implementation of IContentTypeAdvisor by implementing the IConfigurableModule interface, remove the current registrations and to register your own implementation instead.

slideshoadvisor

Look at my DependencyResolverInitialization for that.

Disable the “Suggested Content Types” feature

Look at DependencyResolverInitialization and just don’t register your own IContentTypeAdvisor after ejecting the existing registrations.

This will remove all registered implementations and your editor will never see any suggested content types.

noadvisors

Tweaking and extending Episerver Forms – Part 2

This is a blog version of the presentation of Episerver Forms called “Episerver Forms – the new black?” I had on the Episerver developer Meetup in Stockholm February 9.

Episerver Forms was released from its beta stage just a couple of days earlier so we could take a look at what the final version looks like.

I will here cover the basics but you can find some more documentation on http://world.episerver.com/add-ons/episerver-forms/.

I have also updated my GitHub repository https://github.com/alfnilsson/EpiserverForms with my findings.

XForms – Out with the old …

First I had a quick review of the current editorial form management part of Episerver – XForms.

The Wikipedia article on XForms describes that it “is an XML format used for collecting inputs from web forms”, the first version standardized 2003 and the latest update was 2009.
Episerver took this standard and implemented it as a way to store the form specifications in Episerver CMS 4.60. However it has some good parts as well as some parts that leaves us wishing for more.

Pros

XForms

The Editor UI for XForms

  • The specifications for XForms is standardized format, meaning you can import and export them between other systems that support this standard.
  • Using a user interface, it’s easy for editors to create simple forms.
  • Developers can extend submitting and rendering using delegates & events.
  • Submitted information from the visitors can be exported to Excel (and XML) files.
    What I think is amusing is that the file is only a file containing a HTML table saved into a file with the file extension .xls, but Excel can handle it.

Cons

markup

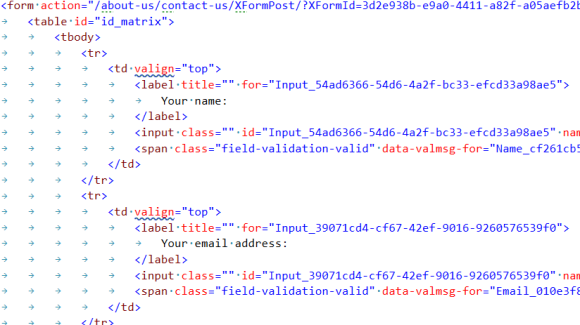
Sample markup from an XForm

  • The forms that can be created are very basic!
  • Also the editor UI is very rudimentary
  • There are no language or versioning support
  • It is hard to organize the forms as you only have a one level folder system.
  • The rendering of the forms that you get out of the box use very bad markup with tables.
  • XForms is an old standard

… in with the new – Episerver Forms

The new editorial form management in Episerver is simply called Episerver Forms. As a developer you install it as a add-on from Episerver’s Nuget Feed. In November 2015 it became available as a beta and released live on Friday February 5 with Episerver – update 99.

I really like the fundamental idea in Episerver Forms where the specification of the form including the form fields is stored as Content, which means that rendering the form is made by the normal templating system in Episerver.
However I don’t agree on some other parts on how the form is managed.

Pros

forms

The editor UI for Episerver Forms

  • As Episerver Forms is based on Content, you also get some of the fundamental concepts in the same package such as
    • Versions
    • Localization
    • Folder structure
  • Built in form “fields”
    • Multi step forms
    • Upload files
    • Captcha
  • Submitted information from the visitors can be exported to XML, CSV & JSON
  • Built in support for confirmation and notification e-mails
  • Developer can extend submitting using web hooks and delegates & events
  • Developers can extend rendering using Views
  • Developers can create custom field types using BlockTypes
  • Developers can extend what to do when form is submitted by creating custom Actors.

Cons

  • Keep in mind as Episerver Form creates contens as you’re adding form and form elements. This might break content based license models.
    For Episerver Find you will manually need to tell Episerver Find to not index Form Container Blocks and
  • Out of the box JavaScript based with AJAX posts
  • Compromises and workarounds

So what about the new stuff?

Creating a form using the editor UI

forms ui.png

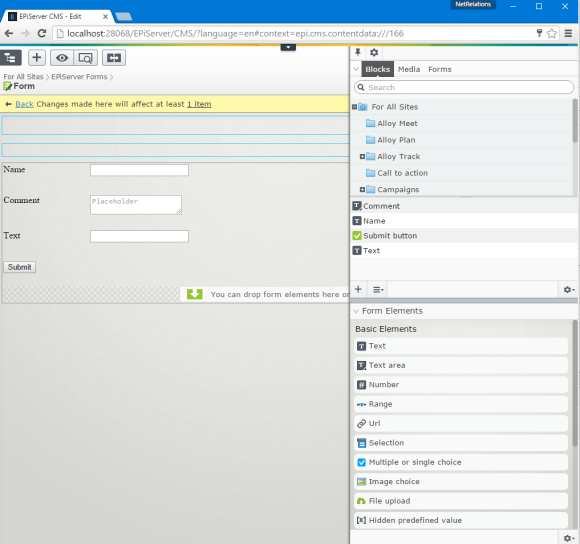
Creating and editing forms is basically the same as creating and editing Blocks.

The form itself is a Form Container Block (EPiServer.Implementation.Elements.FormContainerBlock) and the form elements inherits EPiServer.Forms.Core.ElementBlockBase.
Each element will be stored in the Form Contain Block’s Content Asset folder.

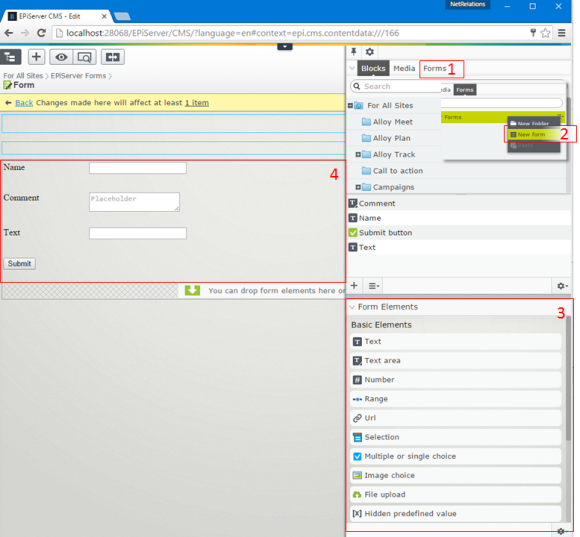
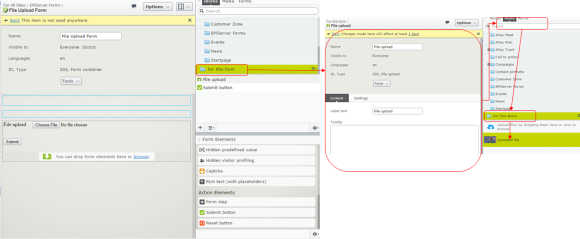
However the editor UI makes the block-part a bit abstract for the editor as there is a new component in the Assets Pane called Forms (1 on the image above).
This component is basically just a shortcut to the folder called “Episerver Forms” and here you can only create new Form Container Blocks and folders (2 on the image).

Form content and elements

As you’re editing your form, you can easily add new elements using the Gadget “Form Elements” (3 on the image) that automatically opens and drag them to the Content Area of your form (4 on the image).

There are also some content possibilities where you can add a heading and a description.

Form settings – Content tab

all properties

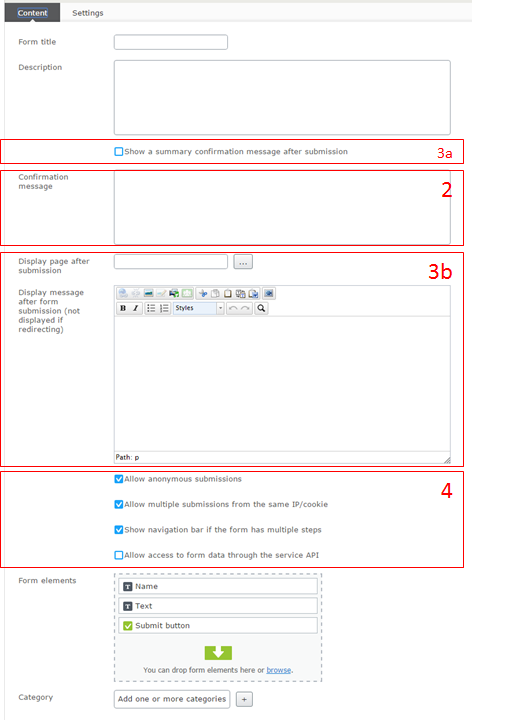
Switching to “All properties” you will see some more settings and content that you can apply.

Filling the field “Confirmation message” (2) displays an alert, for example “Are you sure you are ready to post?” (will not work without JavaScript)

After submitting the form, do you want the visitor to stay on the same page and replace the form with a “thank you” message, or redirect the visitor to a specific page? Set this in either “Display page after submission” (3a + 3b).

You can also add some behavior settings such as allowing anonymous (not logged on) users to submit the form and allowing same users to submit the form multiple times. Personally I always forget to check these ;)

You can also allow the submitted information to be read using the Service API.

Don’t ask me what you would do with Categories on forms though, this is built-in on all Blocks but can be hidden using this little hack.

Form settings – Settings tab

Settings

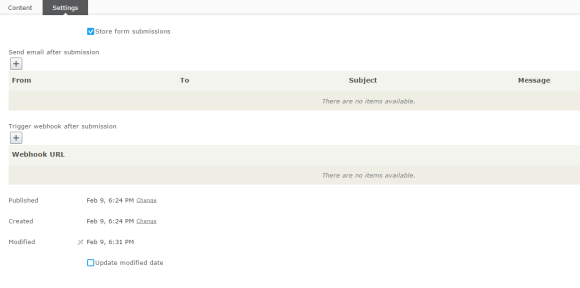
In the Settings tab you can set what you want to do when the visitor submits the form. In XForms this was something you set on the submit button but will now be something set on the actual form.

Storing data

First and foremost you can set that information should be stored. Form submissions will then be stored in the Dynamic Data Store (DDS) but there is an API that can be used to read the information.

view submitted

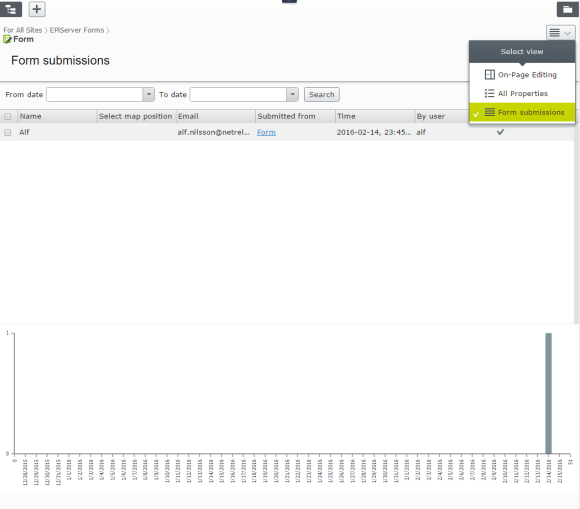
Stored data can also be seen and exported in the view Form Submissions.

Actors

You can add your own “actors” that will act on incoming information.

There are two built in actors that you can use but you can create your custom ones as well.

E-mails

In these e-mails you can set sender, recipient, subject and the message. All these fields can use “placeholders” that will fetch data from the visitor’s form submission.

email

Note that you should allow the server to send e-mails from the sender domain or there is a risk that your messages are classed as junk. This is done setting up a DKIM authentication.
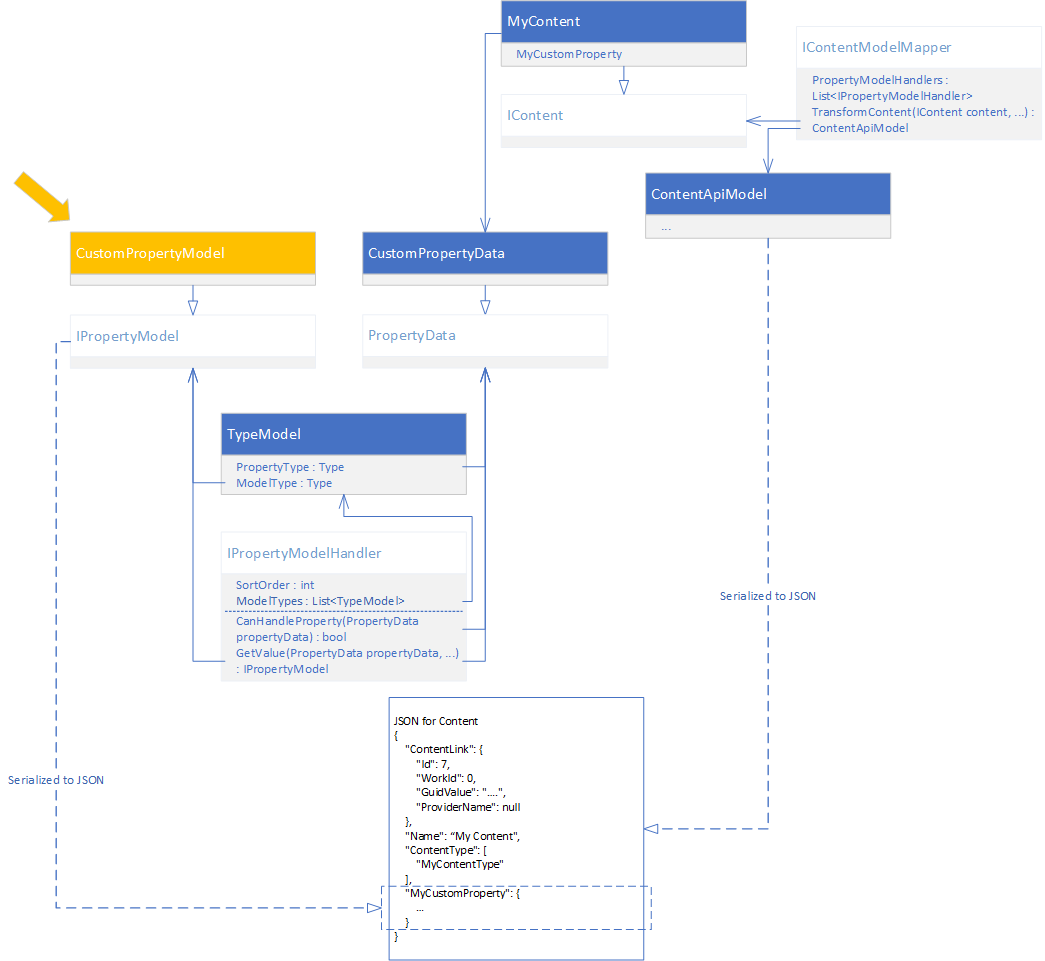
Web Hooks

You can provide Web Hooks where the server will send the submitted information.
This will send the submitted in a JSON serialized format which is quire cryptic. I will mention this further down in the section about events.

Configuration

You can customize some parts of Episerver Form with configuration.

<episerverforms minimumAccessRightLevelToReadFormData="Edit"
	sendMessageInHTMLFormat="true"
	defaultUploadExtensionBlackList="asp,aspx,asa,ashx..."
	coreController="/EPiServer.Forms/DataSubmit"
	formElementViewsFolder="~/Views/Shared/ElementBlocks"
	workInNonJSMode="false"
	injectFormOwnJQuery="true">
  • minimumAccessRightLevelToReadFormData
    Set what level the editor requires to read the submitted information. For example read, or administer
  • sendMessageInHTMLFormat
    Do you want e-mail messages to be sent as HTML or plain text?
  • defaultUploadExtensionBlackList
    You can blacklist file types that should be available to upload using the File upload element (see below).
  • coreController
    Do you want to use another controller when submitting the form? Set the path here.
  • formElementsViewsFolder
    Set where you want to have your custom view templates that overrides the ones built in.
  • workInNonJSMode
    Do you want the form to work without JS? Who doesn’t so I don’t really understand this would be an opt-in? See more about my thoughts concerning the non-JS fallback below.
  • injectFormOwnJQuery
    As the template for the form is using JQuery you can tell Episerver Forms not to inject the library (a quite old version 1.7.2).
    This would be to prevent your own website’s JQuery to conflict with the one injected by Episerver Forms.

Working without JS

During BETA, the Form required JavaScript to work. Mainly to get the multi-step to work, but also to submit the form.

After multiple requests to make Episerver Forms to work without JavaScript, Episerver added a configuration setting to make this work.

And the “fallback” isn’t even good!

but-why.gif

Setting the configuration workInNonJSMode to “true” will make the form to make a good old HTTP POST Request to the controller.

If the submitted information does not validate, for example required fields are not filled or validation on e-mail addresses, the controller redirects the user back to the page containing the form with some querystrings that includes the problem.

non js

Not only can the querystring be modified to say something else, the field that the visitor had posted are cleared.

Refreshing the page after a successful or unsuccessful submit will also continue to display the message.

Extend rendering

The built in views are stored in the folder modules\_protected\EPiServer.Forms\Views\ElementBlocks and have the name as the BlockData class representing the element, for example TextboxElementBlock.ascx.

As you can set a folder for your custom views and override the existing ones, all you need to do is to add a partial view with the same name as the original.

Look at my custom view _TextboxElementBlock.ascx, rename it to not start with an underscore and it will be used to render Textbox elements.

The built in views are ascx files for Web Forms but the work in MVC websites as well.

Extend element types

It’s very easy to create your own element types. So easy that there already are some blog posts about it. By Arve Systad and by David Knipe.

select map.PNG

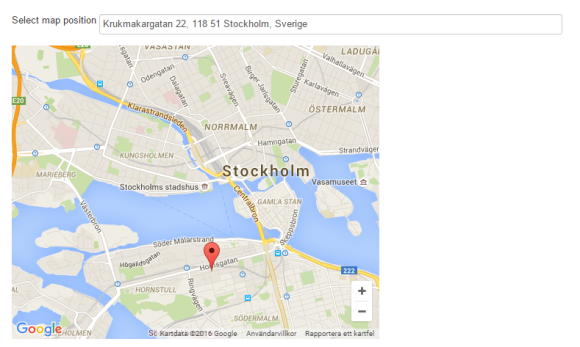
I made my own element type for my presentation that allows the visitor to select a location on a Google Map.

For this example I created a block type MapElementBlock and a view for it.

I used the JQuery plug-in “JQuery Location Picker” which meant that I needed to add a JavaScript file, insert it into the Bundle Config and add a reference to the Google Maps API into the layout.

To finalise the editor experience I needed to add a translation for my new content type.
Otherwise newly created form elements of this type will have a name that is an error message from LocalizationService about not being able to find a translation.

Built in fields

There are some nice fields that you can use. These does not exist in XForms and the customer’s were often asking the Episerver partners if they can be added (with some headaches and work they could)

File upload

A simple file upload form.You can set valid file types and a maximum file size.

The uploaded file will be stored in the Content Asset folder for the block representing the File Upload-field, just don’t rename them as the connection to the submitted data will be lost..

inception.png

This means that the file will have the same access rights as the File upload element, which in turn will have the same access rights as the form it belongs to.
Inception anyone? :)

Captcha

captcha

There are many ways to create a Captcha, this is a simple one that will create an image, and validate that you entered the text that was “visible” on the image.

Multiple steps

A simple way to create a step-by-step wizard. For each step the visitor completes, the information will be saved. You don’t need to wait for the visitor to finalize the form to see the information from the completed steps.

steps

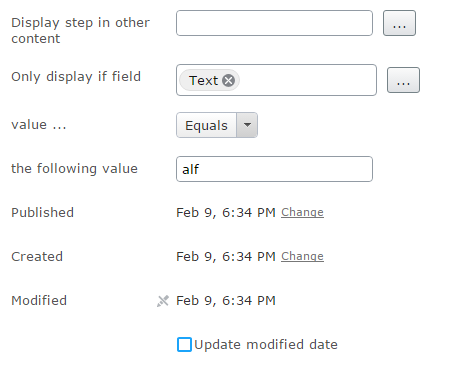
You can also setup rules to display steps for visitors that entered specific values in values from previously completed steps.

multi step rules

Predefined lists

You can create predefined lists so that the visitor can select values based on something dynamic. This is used by creating a “FeedProvider” that implements EPiServer.Forms.Core.ExternalFeed.IFeedProvider.

Episerver Forms has a built in that can read from XML Feeds such as RSS. In Forms.config you can easily try one using the Episerver World Blog RSS Feed.

Extend submitting – events

You can extend what’s going on when submitting a form by hooking up to these delegate events:

  • FormsSubmitting
    Before each step, at least once
  • FormsStepSubmitted
    After each step, at least once
  • FormsSubmissionFinalized
    When final step is posted
  • FormsStructureChange
    When Form Container Block is published

Submitting forms

For each time the visitor submits the form or goes from one step (see multiple steps above) to the other, the FormsSubmitting will be fired.
As there is a built in multi-step support, FormStepSubmitted will always be fired at least once.
Once the customer submits the form, FormSubmissionFinalized is fired.

The data in the event arguments are a bit cryptic to determine which value belongs to which field.

submitted

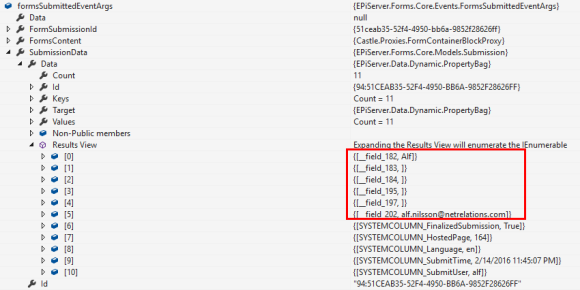
For example my element Name” has the key “__field_182” as the Block representing this element has the Id “182”.

You can use my InitializationModule to see what kind of information is posted.

Change structure

As the Form stores the information in the DDS, the structure of the Store needs to be altered when you change the form structure (adding, removing, changing order of fields).

FormStructureChange is an event where you can listen to these activities.

Summary

I really like the concept with Episerver Forms, especially that it is based on Content and Templates.

However I see that there are flaws and compromises in the implementation of posting data. I hope this gets a look at in a version 2 in the near future.

I’ve got some ideas on how to make Episerver Forms to make a classic “Post to yourself” kind of Form that I hope I get some time to put it in code soon.

Take a look at my GitHub repository and feel free to give me some feedback with things you like/dislike with Episerver Forms. I would really like to hear if you have your own workarounds or ways to play around with the new Episerver Forms.

Display Help text in All Properties Editing

To see a property’s help text in EPiServer 7, the editor needs to hover the property label.
Helptext visible by hover
This is not always an intuitive behavior for the editor but I’ve found a way to it by making the help text visible next to the property.

Create css file

Create a .css file in /ClientResources/Styles, I call mine “editorhelp.css”.

Add the following styles : UPDATED FOR EPISERVER 9 and 10 (verified on 10.3.1)

.Sleek .dijitTabPaneWrapper .epi-form-container__section__row label[title]:after {
    content: attr(title);
    display: block;
    font-size: 0.8em;
    font-style: italic;
    margin: 0.3em 0 0 0;
}

Register your .css file

Add the following to module.config

<module>
	<clientResources>
		<add name="epi-cms.widgets.base"
				 path="Styles/editorhelp.css"
				 resourceType="Style"/>
	</clientResources>
</module>

Tadaa!

Go to edit mode and your Help text should be visible.
Help text displayed

Note that EPiServer is very good on caching this. You might need to clear your cache and restart your website.

Tagged

Extend your functionality by using Blocks

I’ve found that you can create a small toolbox for the editor to change the behavior of your functionality by using Blocks, not as models but as pluggable functions. It’s quite similar to visual programming where you play around with boxes and arrows but in this case we create Blocks and drag them either to a ContentReference or a ContentArea.

Functionality Blocks

The idea came from a project where multiple web sites are using their own instance of the same EPiServer project. Each website had different requirements of filters and I needed something generic where a super user could setup and change the functionality.

Cut to the code

First I created an interface that I will put on each BlockType:

    public interface IDoSomethingWithPageLists : IContentData
    {
        IEnumerable<PageData> DoSomething(IEnumerable<PageData> pages);
    }

In my first implementation, say you’re listing lots of pages and the editor wants to reverse the order, this is a really silly example though.

    [ContentType(DisplayName = "Reverse pages", GUID = "1f58e116-6576-4737-8d2c-246010b5b302")]
    public class ReverseBlock : BlockData, IDoSomethingWithPageLists
    {
        [Display(
            Name = "Property Name",
            GroupName = SystemTabNames.Content,
            Order = 1)]
        public virtual string PropertyName { get; set; }

        public IEnumerable<PageData> DoSomething(IEnumerable<PageData> pages)
        {
            return pages.Reverse();
        }
    }

That was quite easy, you can also give the editor the possibility to give details or variables to the logic. Such as filtering on that a property requires a value.

    [ContentType(DisplayName = "Property must contain value", GUID = "25ed56de-0d0b-43bb-8beb-8a8442e1bdd1")]
    public class PropertyMustContainValueBlock : BlockData, IDoSomethingWithPageLists
    {
        [Display(
            Name = "Property Name",
            GroupName = SystemTabNames.Content,
            Order = 1)]
        public virtual string PropertyName { get; set; }

        public IEnumerable<PageData> DoSomething(IEnumerable<PageData> pages)
        {
            return pages.Where(p => p[this.PropertyName] != null);
        }
    }

And just for the case of repeating the possibility of letting the editor decide.

    [ContentType(DisplayName = "Take every #", GUID = "7b9f13a6-22fe-4c0f-a804-ff81879fa986")]
    public class TakeEveryBlock : BlockData, IDoSomethingWithPageLists
    {
        [Display(
            Name = "Take Every",
            GroupName = SystemTabNames.Content,
            Order = 1)]
        public virtual int TakeEvery { get; set; }

        public IEnumerable<PageData> DoSomething(IEnumerable<PageData> pages)
        {
            for (int i = 0; i < pages.Count(); i++)
            {
                if (i % this.TakeEvery == 0)
                {
                    yield return pages.ElementAt(i);
                }
            }
        }
    }

So in my Page Template, all I need to do iterate through my Blocks and let them do what they’re good at.

    IEnumerable<PageData> pages = GetChildren(CurrentPage.PageLink); // Getting children is only a simple example.

    if (CurrentPage.FunctionBlocks != null)
    {
        var blocks = this.CurrentPage.FunctionBlocks.FilteredItems.Select(x => this.Get(x.ContentLink)).Where(x => x != null);
        foreach (var block in blocks)
        {
            pages = block.DoSomething(pages);
        }
    }

    // Do something with the pages such as binding a Repeater/PageList or adding to a Model

Summary

This is a really simplified example how the editor easily plugg in some customized logic to my existing function.

It can sometimes be a little confusing for the editor if you use Functionality Blocks to create a too complex solution. But to simplify for the editor, you can use EditorDescriptors or creating custom Dojo components to help your Editor.

In this example, I’m automatically adding the filters. You can also render these blocks to the visitor and let the visitor activate the logic.

Creating Modular Settings with Blocks

2014-05-16: Updated the code to include code that disappeared due to non html-encoded code.

Through the years there has been many ways to add settings to an EPiServer site. To mention a few there are GuiPlugins in the Admin Mode Plug-in Manager, Dynamic Properties, Global Properties on the Start Page, special Settings Page Types etc.

First place: The Settings Page!

SettingsPage One of my favourites was the concept of a “Settings Page”! You’ve got version history, language management, you’re not mixing content and settings! But I would like to have it a little more modular where I could contain the Settings data close to where it is used. For example if I had a Gallery I would like to keep the Gallery settings in that Namespace or even that assembly. But after only a year in a busy project, that Settings Page Type could be bloated with properties, tabs and what not! That I had to add more Properties to that greedy all-knowing SettingsPage class each time I need to add a few more settings made that Page Type to something big and ugly that only a mother would love. Not to mention how difficult it is to find that exact property in Edit Mode and reversing a version in the version manager without accidentally reversing some other setting for some other module.

The runner up: Plug-ins!

GuiPlugIn This is an old sturdy trustworthy concept. I can even drop a complete assembly containing almost everything I need to have my Image Gallery (just as an example) up and running and for settings can easily be managed in the Plug-in Manager without being mixed with other settings in the code structure. But with today’s features where we’re getting used to version and language management we are no longer interested in this old plain data management. Not to forget that the user has to be an administrator to be able to access the settings and we’re easily getting back to the bloated editor view filled with many fields screaming for attention.

The new kid in town: Blocks!

SettingsBlock Now with Blocks in EPiServer 7 the concept “A Page in EPiServer is necessarily not something you can browse to” becomes a fact since a PageData in previous versions was used to contain data of various sorts – such as Settings. By using Blocks in EPiServer for settings, not only can the settings be modular, but you also have some sweet toys such as

  • Access Rights management through the ACL (and the forget-me-not Access to Tabs). If you play your cards right you could also set different settings for different users based on VisitorGroups and Roles.
  • Version management that only handles versions for your current module.
  • Language Management and even being able to set Fallback Languages for a specific Settings.
  • Fallback/Default values capabilities where you can add logic to the Get/Set Properties as well as the SetDefaultValues method.

I’m aware of the cons where it can end up with multiple Blocks instead of a single view filled with multiple fields. I think that this is a start where we can add a rich Settings Manager and improve the experience for the Editor and still have a strong and flexible data layer underneath. I have made a quick Proof of Concept of my idea and it can be found on GitHub.

Cut to the Code!

First, I created an Interface, in this Draft it doesn’t do anything else except helping me identify that this is one of my Settings.

public interface ISettingsBlock : IContentData
{
}

All I need to do is to implement this to my Block. Note that I’ve also made this unavailable for editors. I don’t want this thing being created all over the place!

[ContentType(DisplayName = "My Settings", GUID = "bc9d37bd-c725-4b8b-8a23-039710f476bf", Description = "", AvailableInEditMode = false)]
public class MySettingsBlock : BlockData, ISettingsBlock
{
    [Display(
        Name = "My Setting",
        GroupName = SystemTabNames.Content,
        Order = 1)]
    public virtual string MySetting { get; set; }
        
    [Display(
        Name = "My Setting with a Fallback",
        GroupName = SystemTabNames.Content,
        Order = 2)]
    public virtual string MySettingWithFallback {
        get
        {
            var contentLoader = ServiceLocator.Current.GetInstance<IContentLoader>();
            return this["MySettingWithFallback"] as string
                ?? contentLoader.Get(ContentReference.StartPage).Name;
        }
        set { this["MySettingWithFallback"] = value; } }
}

And since we want to easily find our Settings Blocks and don’t want to manually create them, I’ve added a little utility class for this.

public class SettingsRepository<T> where T : BlockData, ISettingsBlock
{
    #region [ Private Fields ]
    private const string RootFolderName = "[Settings]";
    private static readonly ConcurrentDictionary<string, object> MiniLocks = new ConcurrentDictionary<string, object>();

    #endregion

    protected virtual ContentReference ParentFolder
    {
        get
        {
            return GetOrCreate(ContentReference.SiteBlockFolder, "[Settings]");
        }
    }

    protected virtual string DefaultBlockName
    {
        get
        {
            var repo = ServiceLocator.Current.GetInstance<BlockTypeRepository>();
            var blockType = repo.Load<T>();
            return blockType.DisplayName;
        }
    }

    public T Instance
    {
        get
        {
            return GetOrCreateSettingsBlock();
        }
    }

    protected virtual T GetOrCreateSettingsBlock()
    {
        ContentReference contentLink = this.GetOrCreate(this.GetOrCreateContentFolder(), this.DefaultBlockName);
        var repo = ServiceLocator.Current.GetInstance<IContentRepository>();
        return repo.Get<T>(contentLink);
    }

    private ContentReference GetOrCreateContentFolder()
    {
        var repo = ServiceLocator.Current.GetInstance<IContentRepository>();
        ContentReference contentLink;
        var child = repo.GetChildren<ContentFolder>(ContentReference.SiteBlockFolder, LanguageSelector.AutoDetect(true)).FirstOrDefault(x => x.Name.Equals(RootFolderName));

        if (child == null)
        {
        const string Key = "ContentFolder";

        // Lock to prevent duplicates from being created.
        object miniLock = MiniLocks.GetOrAdd(Key, k => new object());

        lock (miniLock)
        {
            var childInLock = repo.GetChildren<ContentFolder>(ContentReference.SiteBlockFolder, LanguageSelector.AutoDetect(true)).FirstOrDefault(x => x.Name.Equals(RootFolderName));

            if (childInLock == null)
            {
            var clone = repo.GetDefault<ContentFolder>(ContentReference.SiteBlockFolder);
            clone.Name = RootFolderName;
            contentLink = repo.Save(clone, SaveAction.Publish, AccessLevel.NoAccess);
            }
            else
            {
            contentLink = childInLock.ContentLink;
            }

            // Saving some space
            object temp1;

            if (MiniLocks.TryGetValue(Key, out temp1) && (temp1 == miniLock))
            {
            object temp2;
            MiniLocks.TryRemove(Key, out temp2);
            }
        }
        }
        else
        {
        contentLink = child.ContentLink;
        }

        return contentLink;
    }

    private ContentReference GetOrCreate(ContentReference parentLink, string name)
    {
        var repo = ServiceLocator.Current.GetInstance<IContentRepository>();
        ContentReference contentLink;
        var child = repo.GetChildren<T>(parentLink, LanguageSelector.AutoDetect(true)).FirstOrDefault() as IContent;

        if (child == null)
        {
        string key = typeof(T).ToString();
        
        // Lock to prevent duplicates from being created.
        object miniLock = MiniLocks.GetOrAdd(key, k => new object());

        lock (miniLock)
        {
            var childInLock = repo.GetChildren<T>(parentLink, LanguageSelector.AutoDetect(true)).FirstOrDefault() as IContent;

            if (childInLock == null)
            {
            var clone = repo.GetDefault<T>(parentLink) as IContent;
            clone.Name = name;
            contentLink = repo.Save(clone, SaveAction.Publish, AccessLevel.NoAccess);
            }
            else
            {
            contentLink = childInLock.ContentLink;
            }

            // Saving some space
            object temp1;

            if (MiniLocks.TryGetValue(key, out temp1) && (temp1 == miniLock))
            {
            object temp2;
            MiniLocks.TryRemove(key, out temp2);
            }
        }
        }
        else
        {
        contentLink = child.ContentLink;
        }

        return contentLink;
    }
}

To get the setting I’m interested in, all I need to do is

var mySetting = new SettingsRepository<MySettingsBlock>().Instance.MySetting;

My next step would be to maybe move some of the information such as the Block Name to the Interface (and by that to the Block class itself) instead of the Repository but that feels more like a religious discussion. But the thing that would really improve this concept would be a some kind of interface to get an overview of (and possibly edit) all Settings.

Change how your EPiServer ContentType is administered with AdministrationSettingsAttribute

Are you tired of Administrators changing your Content Types and breaking your web site?

Fear not, I’ve found a cool hidden gem that allows you to disable fields when editing Content Types in Admin Mode – the EPiServer.DataAnnotations.AdministrationSettings attribute.

It is simply added to your Content Type Class

[AdministrationSettings(
  [bool CodeOnly],
  [ContentTypeFields ContentTypeFields],
  [string GroupName],
  [int Order],
  [PropertyDefinitionFields PropertyDefinitionFields],
  [bool Visible])]
public class StandardPage : PageData
{
...
}

With the AdministrationSettings attribute you can edit the following parts

How it is displayed

GroupName
The GroupName is used to group your Content Types in Admin mode.

GroupName

I have set the GroupName = “My Custom Pages” to my Page Type “My Custom Page”

Visible
If you simply want to hide your Content Type in Admin Mode.

Order
An integer where you define the sort order inside the Group.

Disable Administrator accessability

CodeOnly
If you simply want to disable changes for the entire Content Type.

PropertyDefinitionFields
This is an enum flag that only enables certain fields on the Edit Property view for the Content Type.
Note that if you create a Property, it cannot be saved unless you allow the required fields.

  • None
  • Type
  • Name
  • PropertySettingsControl
  • DefaultValue
  • Required
  • Searchable
  • LanguageSpecific
  • DisplayEditUI
  • EditCaption
  • HelpText
  • Tab
  • FieldOrder
  • All
Caption

I have only enabled the Help text with PropertyDefinitionFields = PropertyDefinitionFields.HelpText.

ContentTypeFields
Same as PropertyDefinitionFields but with the fields for your Content Type.

  • None
  • Name
  • Description
  • DisplayTemplates
  • SortOrder
  • DisplayName
  • AvailableInEditMode
  • ACL
  • DefaultValues
  • AvailablePageTypes
  • All
ContentTypeFields

I have only enabled the Description field with ContentTypeFields = ContentTypeFields.Description

Summary

This attribute will help you organize your Content Types and to disable editing capabilities for Content Types you really don’t want an administrator to mess with. But use it wisely!

Having many and small groups can make a mess for the administrator and yourself.