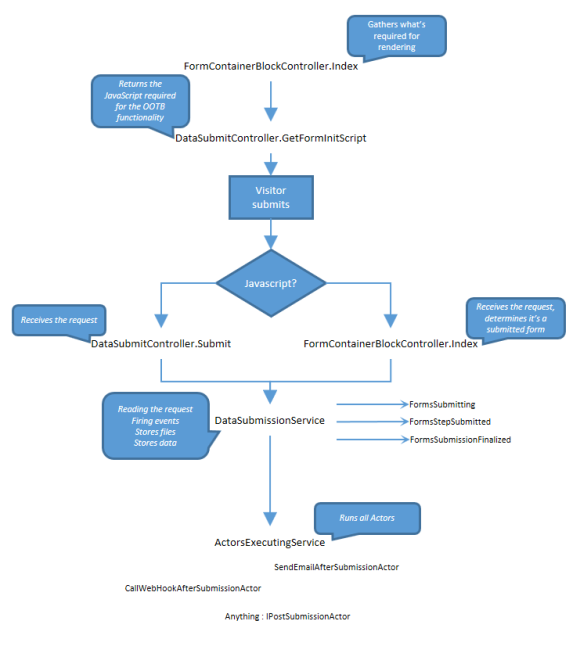
This is a blog version of the presentation of Episerver Forms called “Episerver Forms – the new black?” I had on the Episerver developer Meetup in Stockholm February 9.
Episerver Forms was released from its beta stage just a couple of days earlier so we could take a look at what the final version looks like.
I will here cover the basics but you can find some more documentation on http://world.episerver.com/add-ons/episerver-forms/.
I have also updated my GitHub repository https://github.com/alfnilsson/EpiserverForms with my findings.
XForms – Out with the old …
First I had a quick review of the current editorial form management part of Episerver – XForms.
The Wikipedia article on XForms describes that it “is an XML format used for collecting inputs from web forms”, the first version standardized 2003 and the latest update was 2009.
Episerver took this standard and implemented it as a way to store the form specifications in Episerver CMS 4.60. However it has some good parts as well as some parts that leaves us wishing for more.
Pros
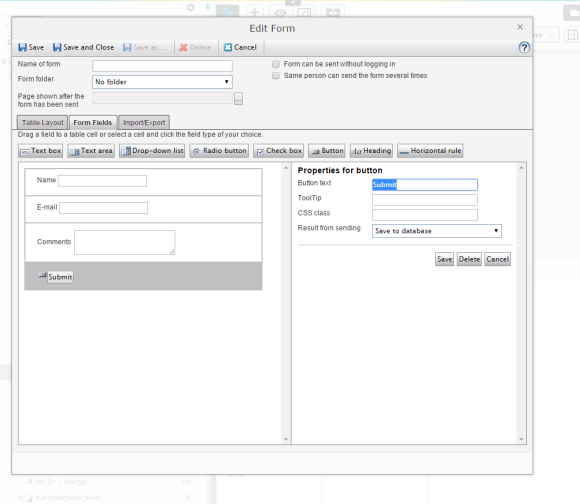
The Editor UI for XForms
- The specifications for XForms is standardized format, meaning you can import and export them between other systems that support this standard.
- Using a user interface, it’s easy for editors to create simple forms.
- Developers can extend submitting and rendering using delegates & events.
- Submitted information from the visitors can be exported to Excel (and XML) files.
What I think is amusing is that the file is only a file containing a HTML table saved into a file with the file extension .xls, but Excel can handle it.
Cons

Sample markup from an XForm
- The forms that can be created are very basic!
- Also the editor UI is very rudimentary
- There are no language or versioning support
- It is hard to organize the forms as you only have a one level folder system.
- The rendering of the forms that you get out of the box use very bad markup with tables.
- XForms is an old standard
… in with the new – Episerver Forms
The new editorial form management in Episerver is simply called Episerver Forms. As a developer you install it as a add-on from Episerver’s Nuget Feed. In November 2015 it became available as a beta and released live on Friday February 5 with Episerver – update 99.
I really like the fundamental idea in Episerver Forms where the specification of the form including the form fields is stored as Content, which means that rendering the form is made by the normal templating system in Episerver.
However I don’t agree on some other parts on how the form is managed.
Pros

The editor UI for Episerver Forms
- As Episerver Forms is based on Content, you also get some of the fundamental concepts in the same package such as
- Versions
- Localization
- Folder structure
- Built in form “fields”
- Multi step forms
- Upload files
- Captcha
- Submitted information from the visitors can be exported to XML, CSV & JSON
- Built in support for confirmation and notification e-mails
- Developer can extend submitting using web hooks and delegates & events
- Developers can extend rendering using Views
- Developers can create custom field types using BlockTypes
- Developers can extend what to do when form is submitted by creating custom Actors.
Cons
- Keep in mind as Episerver Form creates contens as you’re adding form and form elements. This might break content based license models.
For Episerver Find you will manually need to tell Episerver Find to not index Form Container Blocks and
- Out of the box JavaScript based with AJAX posts
- Compromises and workarounds
So what about the new stuff?
Creating a form using the editor UI
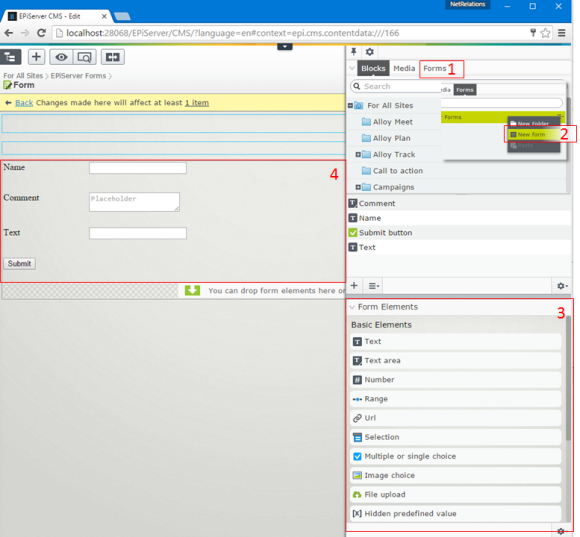
Creating and editing forms is basically the same as creating and editing Blocks.
The form itself is a Form Container Block (EPiServer.Implementation.Elements.FormContainerBlock) and the form elements inherits EPiServer.Forms.Core.ElementBlockBase.
Each element will be stored in the Form Contain Block’s Content Asset folder.
However the editor UI makes the block-part a bit abstract for the editor as there is a new component in the Assets Pane called Forms (1 on the image above).
This component is basically just a shortcut to the folder called “Episerver Forms” and here you can only create new Form Container Blocks and folders (2 on the image).
Form content and elements
As you’re editing your form, you can easily add new elements using the Gadget “Form Elements” (3 on the image) that automatically opens and drag them to the Content Area of your form (4 on the image).
There are also some content possibilities where you can add a heading and a description.
Form settings – Content tab

Switching to “All properties” you will see some more settings and content that you can apply.
Filling the field “Confirmation message” (2) displays an alert, for example “Are you sure you are ready to post?” (will not work without JavaScript)
After submitting the form, do you want the visitor to stay on the same page and replace the form with a “thank you” message, or redirect the visitor to a specific page? Set this in either “Display page after submission” (3a + 3b).
You can also add some behavior settings such as allowing anonymous (not logged on) users to submit the form and allowing same users to submit the form multiple times. Personally I always forget to check these ;)
You can also allow the submitted information to be read using the Service API.
Don’t ask me what you would do with Categories on forms though, this is built-in on all Blocks but can be hidden using this little hack.
Form settings – Settings tab

In the Settings tab you can set what you want to do when the visitor submits the form. In XForms this was something you set on the submit button but will now be something set on the actual form.
Storing data
First and foremost you can set that information should be stored. Form submissions will then be stored in the Dynamic Data Store (DDS) but there is an API that can be used to read the information.
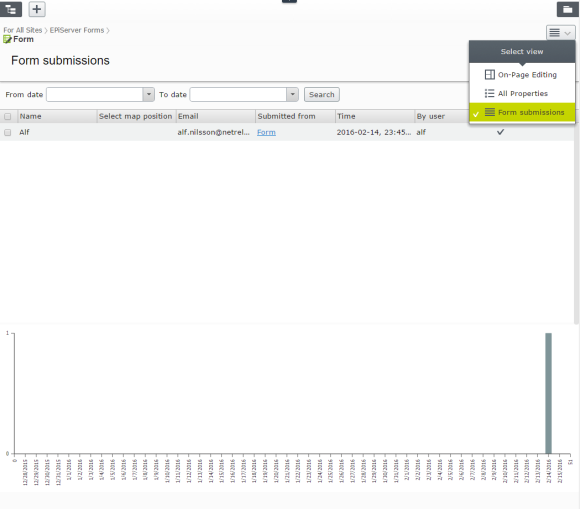
Stored data can also be seen and exported in the view Form Submissions.
Actors
You can add your own “actors” that will act on incoming information.
There are two built in actors that you can use but you can create your custom ones as well.
E-mails
In these e-mails you can set sender, recipient, subject and the message. All these fields can use “placeholders” that will fetch data from the visitor’s form submission.
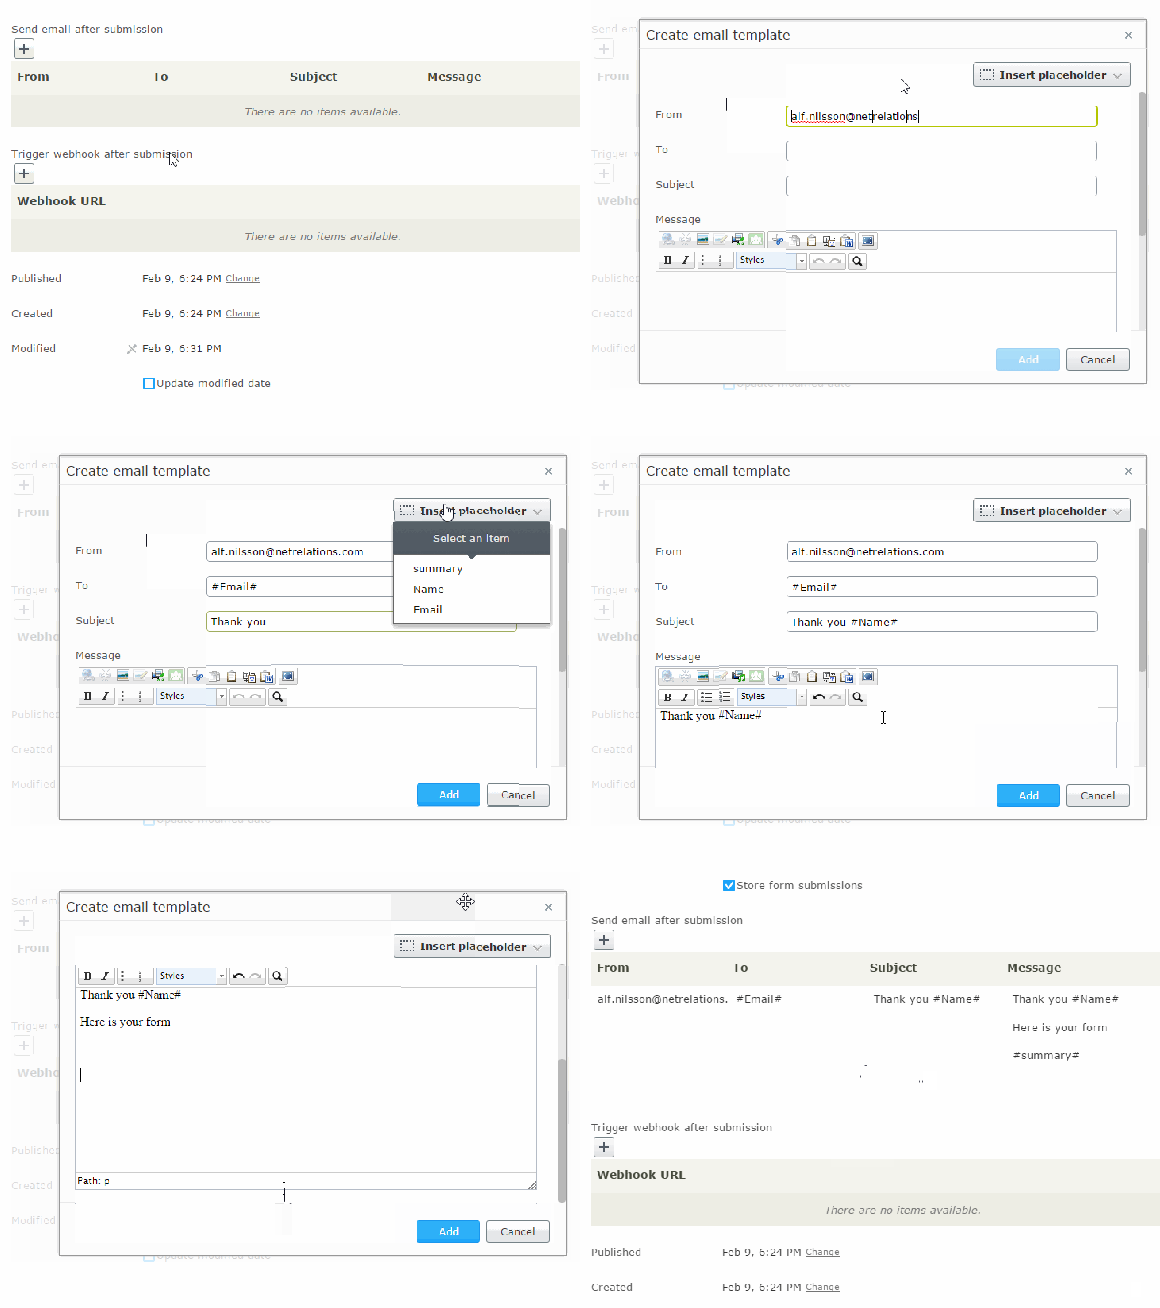
Note that you should allow the server to send e-mails from the sender domain or there is a risk that your messages are classed as junk. This is done setting up a DKIM authentication.
Web Hooks
You can provide Web Hooks where the server will send the submitted information.
This will send the submitted in a JSON serialized format which is quire cryptic. I will mention this further down in the section about events.
Configuration
You can customize some parts of Episerver Form with configuration.
<episerverforms minimumAccessRightLevelToReadFormData="Edit"
	sendMessageInHTMLFormat="true"
	defaultUploadExtensionBlackList="asp,aspx,asa,ashx..."
	coreController="/EPiServer.Forms/DataSubmit"
	formElementViewsFolder="~/Views/Shared/ElementBlocks"
	workInNonJSMode="false"
	injectFormOwnJQuery="true">
- minimumAccessRightLevelToReadFormData
Set what level the editor requires to read the submitted information. For example read, or administer
- sendMessageInHTMLFormat
Do you want e-mail messages to be sent as HTML or plain text?
- defaultUploadExtensionBlackList
You can blacklist file types that should be available to upload using the File upload element (see below).
- coreController
Do you want to use another controller when submitting the form? Set the path here.
- formElementsViewsFolder
Set where you want to have your custom view templates that overrides the ones built in.
- workInNonJSMode
Do you want the form to work without JS? Who doesn’t so I don’t really understand this would be an opt-in? See more about my thoughts concerning the non-JS fallback below.
- injectFormOwnJQuery
As the template for the form is using JQuery you can tell Episerver Forms not to inject the library (a quite old version 1.7.2).
This would be to prevent your own website’s JQuery to conflict with the one injected by Episerver Forms.
Working without JS
During BETA, the Form required JavaScript to work. Mainly to get the multi-step to work, but also to submit the form.
After multiple requests to make Episerver Forms to work without JavaScript, Episerver added a configuration setting to make this work.
And the “fallback” isn’t even good!

Setting the configuration workInNonJSMode to “true” will make the form to make a good old HTTP POST Request to the controller.
If the submitted information does not validate, for example required fields are not filled or validation on e-mail addresses, the controller redirects the user back to the page containing the form with some querystrings that includes the problem.

Not only can the querystring be modified to say something else, the field that the visitor had posted are cleared.
Refreshing the page after a successful or unsuccessful submit will also continue to display the message.
Extend rendering
The built in views are stored in the folder modules\_protected\EPiServer.Forms\Views\ElementBlocks and have the name as the BlockData class representing the element, for example TextboxElementBlock.ascx.
As you can set a folder for your custom views and override the existing ones, all you need to do is to add a partial view with the same name as the original.
Look at my custom view _TextboxElementBlock.ascx, rename it to not start with an underscore and it will be used to render Textbox elements.
The built in views are ascx files for Web Forms but the work in MVC websites as well.
Extend element types
It’s very easy to create your own element types. So easy that there already are some blog posts about it. By Arve Systad and by David Knipe.

I made my own element type for my presentation that allows the visitor to select a location on a Google Map.
For this example I created a block type MapElementBlock and a view for it.
I used the JQuery plug-in “JQuery Location Picker” which meant that I needed to add a JavaScript file, insert it into the Bundle Config and add a reference to the Google Maps API into the layout.
To finalise the editor experience I needed to add a translation for my new content type.
Otherwise newly created form elements of this type will have a name that is an error message from LocalizationService about not being able to find a translation.
Built in fields
There are some nice fields that you can use. These does not exist in XForms and the customer’s were often asking the Episerver partners if they can be added (with some headaches and work they could)
File upload
A simple file upload form.You can set valid file types and a maximum file size.
The uploaded file will be stored in the Content Asset folder for the block representing the File Upload-field, just don’t rename them as the connection to the submitted data will be lost..
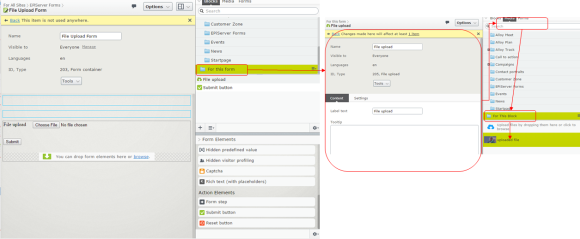
This means that the file will have the same access rights as the File upload element, which in turn will have the same access rights as the form it belongs to.
Inception anyone? :)
Captcha

There are many ways to create a Captcha, this is a simple one that will create an image, and validate that you entered the text that was “visible” on the image.
Multiple steps
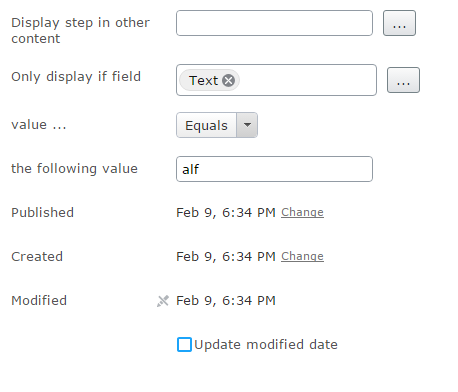
A simple way to create a step-by-step wizard. For each step the visitor completes, the information will be saved. You don’t need to wait for the visitor to finalize the form to see the information from the completed steps.

You can also setup rules to display steps for visitors that entered specific values in values from previously completed steps.
Predefined lists
You can create predefined lists so that the visitor can select values based on something dynamic. This is used by creating a “FeedProvider” that implements EPiServer.Forms.Core.ExternalFeed.IFeedProvider.
Episerver Forms has a built in that can read from XML Feeds such as RSS. In Forms.config you can easily try one using the Episerver World Blog RSS Feed.
Extend submitting – events
You can extend what’s going on when submitting a form by hooking up to these delegate events:
- FormsSubmitting
Before each step, at least once
- FormsStepSubmitted
After each step, at least once
- FormsSubmissionFinalized
When final step is posted
- FormsStructureChange
When Form Container Block is published
Submitting forms
For each time the visitor submits the form or goes from one step (see multiple steps above) to the other, the FormsSubmitting will be fired.
As there is a built in multi-step support, FormStepSubmitted will always be fired at least once.
Once the customer submits the form, FormSubmissionFinalized is fired.
The data in the event arguments are a bit cryptic to determine which value belongs to which field.

For example my element Name” has the key “__field_182” as the Block representing this element has the Id “182”.
You can use my InitializationModule to see what kind of information is posted.
Change structure
As the Form stores the information in the DDS, the structure of the Store needs to be altered when you change the form structure (adding, removing, changing order of fields).
FormStructureChange is an event where you can listen to these activities.
Summary
I really like the concept with Episerver Forms, especially that it is based on Content and Templates.
However I see that there are flaws and compromises in the implementation of posting data. I hope this gets a look at in a version 2 in the near future.
I’ve got some ideas on how to make Episerver Forms to make a classic “Post to yourself” kind of Form that I hope I get some time to put it in code soon.
Take a look at my GitHub repository and feel free to give me some feedback with things you like/dislike with Episerver Forms. I would really like to hear if you have your own workarounds or ways to play around with the new Episerver Forms.
