A common reason I have heard that Episerver developers don’t write automatic tests are that they’re “only doing content websites”.
First of all I suggest that you have an “API first” approach, even if you’re only going to make content based functionality such as listing and filtering News Entries.
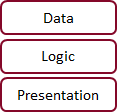
This falls well into the classic three tier layer where you separate data, logic and presentation.
But that’s not what I want to share today. I’m here to talk about Visual Tests!
Visual tests
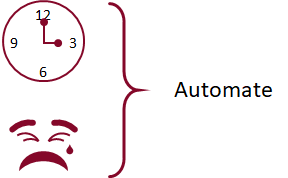
With visual tests I mean that you’re comparing what your website looks like before and after a release. This is normally done just by performing a test routine – following steps such as clicking links or buttons, entering form fields and so on.
This is something that can take far too much time and energy and within a DevOps mindset you want to automate these tasks as much as possible.
Selenium
The first tool I use for automatic visual tests is Selenium which is a tool where you can script a web browser to do basically anything.
You can use various techniques to create your automated scripts, either coding them with many different languages (C#, Python, Ruby or even Perl, JavaScript and PHP).
You can also use your scripts with different web drivers which are available for most modern browsers on the most popular Operating Systems out there. This is very good when you want to make sure that the same function works and looks the same on Microsoft Edge, Firefox, Chrome and so on.
A simple piece of code to browse to a website using the Chrome browser and take a screenshot.
using (IWebDriver driver = new ChromeDriver())
{
    driver.Manage().Window.Size = new Size(1280, 980);
    driver.Url = "http://www.alfnilsson.se";
    ((ITakesScreenshot)driver).GetScreenshot().SaveAsFile(@"c:\temp\www.alfnilsson.se.png", ScreenshotImageFormat.Png);
}
Simple as that. Next problem is that it would take too much time to compare screenshots and there is a risk of the human error. Missing that the font might be wrong or that the margin is a few pixels too large or small.
Simplify comparison with Applitools Eyes
For one of our customers we’re using Applitools Eyes to help us compare the screenshots.
It is a tool where you can create test cases and compare screenshots between different test rounds and get a warning if there is something different between each round.
If you get a warning you can say yes or no whether the change was OK, and if you want to use this screenshot as base for an upcoming comparison.
So what we do in our code is instead of creating a screenshot with the WebDriver, we wrap our WebDriver with the Eyes API.
So with this code we’re doing the same test as previously, but instead of saving the screenshot to disk, we’re starting a test in Eyes and sends the screenshot of our start page.
using (IWebDriver driver = new ChromeDriver())
{
    var eyes = new Eyes
    {
        ApiKey = "--APIKEY--"
    };

    eyes.Open(driver, "My Application", "My Test");

    driver.Manage().Window.Size = new Size(1280, 980);
    driver.Url = "http://www.alfnilsson.se";
    eyes.CheckWindow("Start Page");
    eyes.Close();
}
If there’s any differences, the API will throw an Exception with information on where to verify the screenshots. We can also adjust the code to not throw Exceptions in case we want to.
Automatic Visual Tests after a Release
At the latest Episerver Partner Close Up earlier this year, Eric Herlitz and I had a presentation about DevOps where we showed how you can use your automatic tests as an automated step while deploying.
We implemented these visual tests with the simple tests. Note that some of the screenshots and code are not best practice in a release and test setup but this was enough for demo cases.
1: Create a normal Alloy Website solution
Just use the Episerver Visual Studio Templates to create a standard Alloy Website.
2: Switch the WebDriver to use Phantom JS
As the visual tests will be performed on a TFS agent outside a user context, it is better to use the Headless browser “Phantom JS”. It’s a browser that does not have a UI, but can render and take screenshots of websites as if it was a normal browser.
Simply install the NuGet packages required for Phantom JS and use the OpenQA.Selenium.PhantomJS.PhantomJSDriver instead.
3: Put the code inside a Test Project
Create a Test Project in your solution and start scripting.
In my tests I am performing the following steps
- Browse to the start page
- Send a screenshot to Eyes
- Browe to the contact page which contains a contact form built with Episerver Forms
- Send a screenshot to Eyes
- Submit the form, expecting that some validation messages should show for the required fields
- Send a screenshot to Eyes
- Fill in the field for name and enter an invalid e-mail address into the e-mail field.
- Submit the form, expecting that some validation messages should show for the invalid e-mail
- Send a screenshot to Eyes
- Finish the e-mail address, check some checkboxes and a comment.
- Send a screenshot to Eyes
- Submit the form, expecting that the form should be submitted and a confirmation message to be displayed
- Send a screenshot to Eyes
I have uploaded our tests scripts to my GitHub. In these steps I have made sure that the tests does not throw Exceptions if Eyes notices any differences.
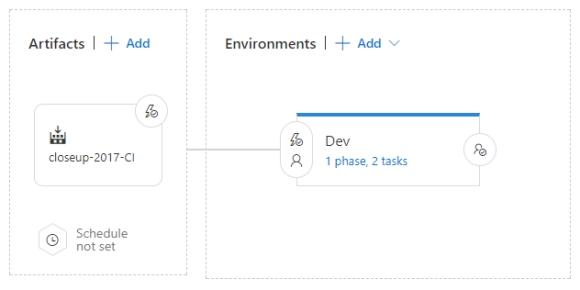
4: Push the code to VSTS and setup VSTS Build to Publish the Artifacts for the test project
Just push your code to a repository in your VSTS, or to a repository that is accessible by VSTS (such as GitHub).
Setup VSTS to build your solution.
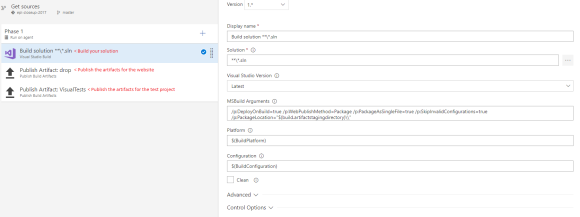
Looking closer at the task for publishing the test project you can see that the artifacts are called “VisualTests”. We will use this later.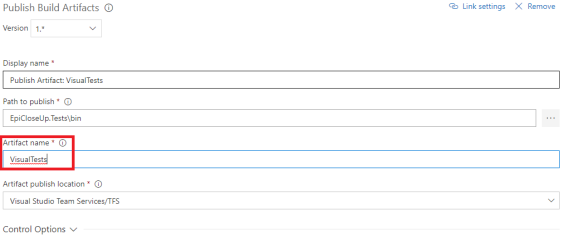
5: Deploy to Azure using VSTS
Create the Azure Resources required for running an Episerver website. this blog post from Erik Henningson contains some Powershell scripts that makes it very easy to get everything up and running.
Me and Eric are more used to using Octopus Deploy for Release Management but we decided to use the VSTS Release Management for our demo.
The steps are quite simple:
- Get the code from the Artifacts
- Put the code to the Azure website that represents my Dev environment (including some configuration transformation)
In a real project I would also add environments for Test, Pre-prod and Production (or simply the Integration environment if I was running DXC Services).
6: Add the Release Step to run your Tests from the artifact “VisualTests”
I added the step to also run the tests from the Artifact “VisualTests”. It will simply run the tests which in turn will start pushing screenshots to AppliTools Eyes.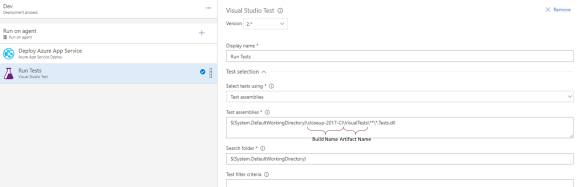
After the deploy, I let my Release Managers approve the release before it can continue on in the Release Life Cycle.
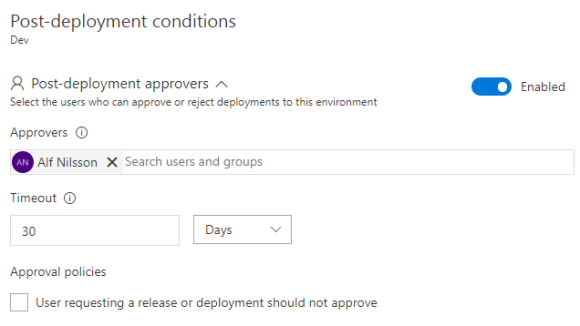
This is so that the manager can verify that everything works as intended without manually performing the test procedures.
Summary
These are the basics of setting up Automatic Visual Tests using Selenium, AppliTools Eyes, VSTS and Azure. As I mentioned everything also doesn’t follow best practices but I imagine that there are experts out in the open on these specific tools, Feel free if you have any hints to share.
Keep in mind that even if Visual Tests is a simple step if you don’t have any automatic tests, but they do NOT replace a good suit of Unit Tests.
Unit Tests can still give you a better best coverage when you have a more complex application and/or have integrations against other systems.
What’s next?
Our next issue is that the tests often fails if someone plays around with content on the dev server for other tests. One approach for this could be to spin more environments for each test purpose, or reset the database.
I have another idea that might help with this and can help with other challenges we’ve experiences. Stay tune for next blog post about Automatic Visual Tests.
