In my previous post I talked about how to set up automatic visual tests – and for a time, it was good. Then editors and other team members starts changing the content and your tests starts showing deviations based on content changes rather than code changes.
Yes, you can set up rules on not changing areas included in the tests, but can you really trust everyone?
To get around this, I started working on a set of Content Providers that will give a static set of content. Kind of like when you’re creating unit tests and mocking implementations for interfaces:
public interface IService {
   string Get(int id);

   string[] List();
}
var mockService = new Mock<IService>(); // Start mocking the interface "IService"

mockService
   .Setup(s => s.Get(It.IsAny<int>())) // Parameter is any integer
   .Returns((string)null); // Return null
mockService
   .Setup(s => s.Get(10)) // But if parameter is 10
   .Returns("alf"); // Return "alf"

mockService
   .Setup(s => s.List()) // When calling List()
   .Returns(new[] { "alf" }); // Return an array that only contains "alf"

IService service = mockService.Object; // Done mocking the interface and create an instance of it
Now let’s create a Test Class to verify that everything Works before building the real implementation of IService.
// Assert that the mocked instance returns what we expect
Assert.AreEqual("alf", service.Get(10));
Assert.IsNull(service.Get(1));

var list =service.List();
Assert.AreEqual(1, list.Length);
Assert.AreEqual("alf",list[0]);
Based on the content types in Alloy Templates I have a sample of the Content Provider that sets up examples of the pages and blocks that I want to test.
Separate project for Models
First of all when I create an Episerver solution, I want to have all Episerver Model related in a separate project. That way I can easier separate code that belongs to presentation (the actual MVC web project) from code that belongs to business logic.
After I have created a standard Alloy Template solution called Toders.VisualTests.Web I move all Content Types and Episerver specific assets that are tightly connected to the Content Types (Attributes, or similar) into a specific Models project.
For Alloy there are also some interfaces, Global constant strings and similar that I need to move so that the project compiles properly. Check my commit in GitHub to see the moved files.
Creating the Content Providers
Once I have moved the Models into a separate project, I can create a separate project that will contain my Content Providers.
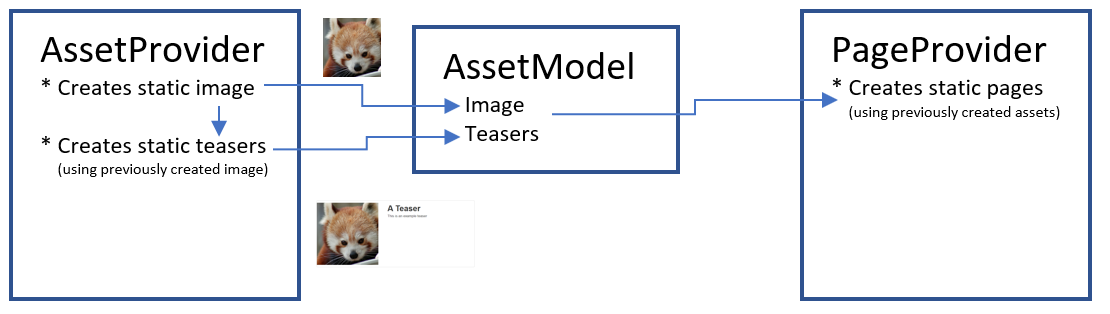
As the Episerver content structures for Assets (Blocks and Media) and Pages are separate. I will need to create two separate Content Providers, the AssetProvider and PageProvider.
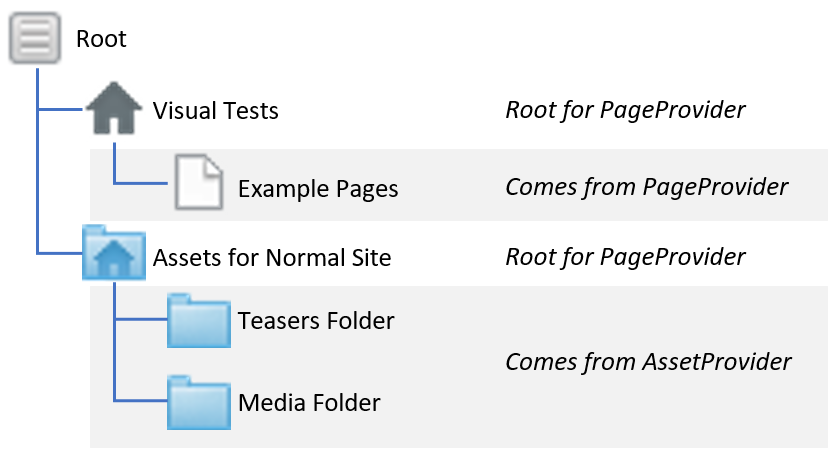
AssetProvider
In the AssetProvider I create the structure for Media and Blocks that will be used on the Pages. It contains an AssetModel so that I can use the created static assets on my Pages.
PageProvider
In the PageProvider I create the structure of the pages that are to be tested. I can create pages that contain Blocks and Media from the ContentProvider.
As you can see I am using the AssetModel to deliver the created assets into the Page Provider.
Initiating everything
To get everything working, I need to create some new Content Types that will act as roots for my Content Providers – StaticStartPage for the Pages and StaticAssetsRootFolder. This is to easier identify which content to use as roots for my Content Providers.
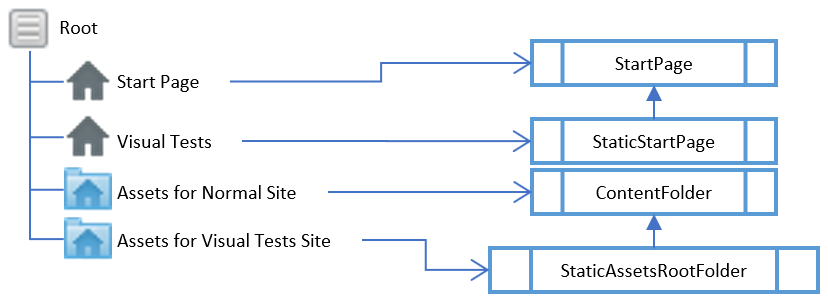
Once the Content Types are created, I create a Start Page for my static content and . With the current implementation, I’ll need to restart my website because I will set up the static website on initialization.
At startup, I have an InitializationModule that checks whether a Page of the type StaticStartPage is created, ensures that there is a Folder of the type StaticAssetsRootFolder and initializes the AssetProvider and PageProvider. The reason I let them implement the original Start Page and ContentFolder is to
After initialization, the module also ensures that there is a SiteDefinition created that is using the static start page as start page.
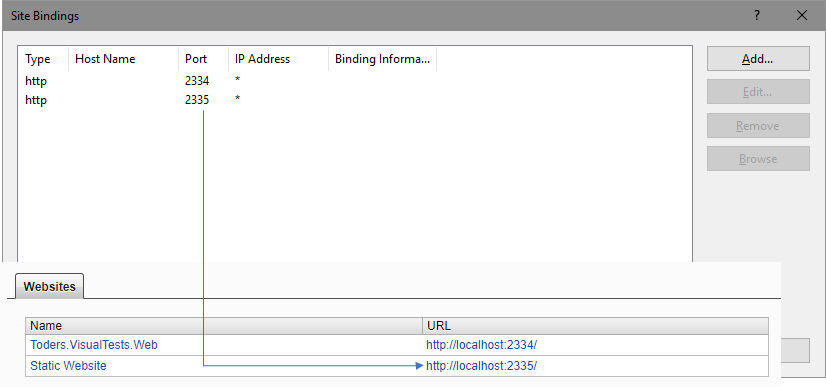
Finally I need to set up my IIS server to listen to the url for the SiteDefinition (per default is it set to localhost:2335, but can be updated to anything in the Admin Mode).
Testing it
Finally I need to create some tests. This part is what I show in my previous blog post about Automatic visual tests.
For this article I’m using some other tests where I have split the implementation between just doing screenshots with PhantomJS and an implementation that user AppliTools Eyes.
Summary
Currently I’m testing what some content with various Display Options looks like what in a Content Area. I also look what text in different formats looks like.
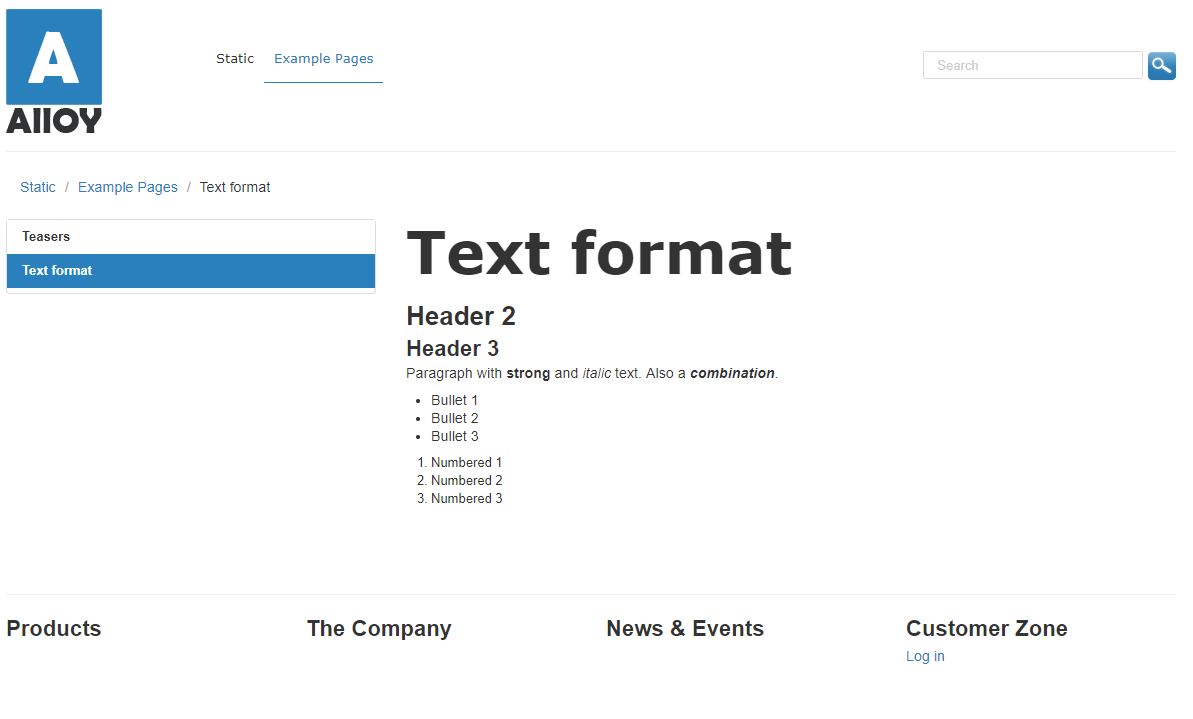
If I would receive a bug report from my editors that bold text within a bullet list looks weird, I can in a TDD behaviour add it to the Page Provider and verify it with my tests:
Before:
var mainBody = "<h2>Header 2</h2>" +
    "<h3>Header 3</h3>" +
    "<p>Paragraph with <strong>strong</strong> and <em>italic</em> text. Also a <strong><em>combination</em></strong>.</p>" +
    "<ul>"+
    "<li>Bullet 1</li>" +
    "<li>Bullet 2</li>" +
    "<li>Bullet 3</li>" +
    "</ul>" +
    "<ol>"+
    "<li>Numbered 1</li>" +
    "<li>Numbered 2</li>" +
    "<li>Numbered 3</li>" +
    "</ol>";

    page.MainBody = new XhtmlString(mainBody);
After:
var mainBody = "<h2>Header 2</h2>" +
    "<h3>Header 3</h3>" +
    "<p>Paragraph with <strong>strong</strong> and <em>italic</em> text. Also a <strong><em>combination</em></strong>.</p>" +
    "<ul>"+
    "<li>Bullet 1</li>" +
    "<li>Bullet 2</li>" +
    "<li>Bullet 3</li>" +
    "<li><strong>Fat text</strong></li>" +
    "</ul>" +
    "<ol>"+
    "<li>Numbered 1</li>" +
    "<li>Numbered 2</li>" +
    "<li>Numbered 3</li>" +
    "</ol>";

    page.MainBody = new XhtmlString(mainBody);
I hope this gives you some inspiration on how to improve your QA and tests on your website. Of course having a separate website requires that you have a License that allows for multiple websites. This can be achieved using sub pages to your already existing websites, but there’s a risk that you can’t have a fully testable copy of your original website.
You can download the code from GitHub, and set it up with the following steps:
- Set up a standard Alloy Templates database and adjust the connectionstrings.config
- Set up an IIS server pointing to the src\Alloy.MVC.Template folder on your drive, make sure that it has two bindings – one for the ordinary Alloy Website and one for your static content
- Make sure that the InitializationModule are using the correct url for the static website in the field StaticWebsiteUrl in the top of the class
- Create a page of the type “Static Start Page” under the root page
- Unfortunately you’ll need to restart the website so that the Site Definition will come in place
